This blog explain how we can make use of the default login html pages created if we are selected the Form based authentication created. Also explain how we can create a login screen in ADF.
Create a fusion application
Enable ADF security with ADF Authentication and Authorization option
Select Authentication type as Form based authentication.
Select the default choice No Automatic grants
Specify the default choice of authenticated welcome page select on Generate Default.
The summary page
Create a page mypage.jspx and add a af:ink in it.
Add following expression to the text of af:link
Change the destination property with the following expression
Create the user in the jazn-data.xml file .The user is added to the role app-role1 below
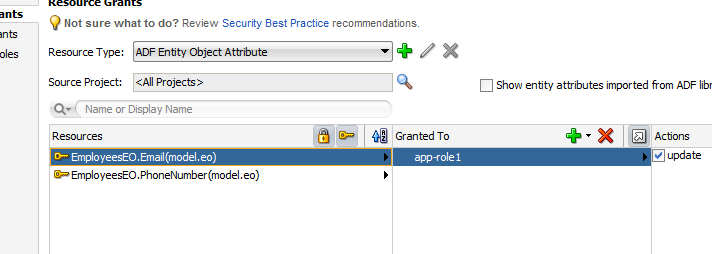
Granting the resource permission to the role app-role1
Login as the user
Click on submit
Now we can try to create an ADF screen for login screen.Create a managed bean as below :
package view;
import java.io.IOException;
import javax.faces.application.FacesMessage;
import javax.faces.context.FacesContext;
import javax.security.auth.Subject;
import javax.security.auth.callback.CallbackHandler;
import javax.security.auth.login.FailedLoginException;
import javax.security.auth.login.LoginException;
import javax.servlet.RequestDispatcher;
import javax.servlet.ServletException;
import javax.servlet.http.HttpServletRequest;
import javax.servlet.http.HttpServletResponse;
import weblogic.security.SimpleCallbackHandler;
import weblogic.security.services.Authentication;
import weblogic.servlet.security.ServletAuthentication;
public class LoginPageName {
private String username;
private String password;
public void setUsername(String username) {
this.username = username;
}
public String getUsername() {
return username;
}
public void setPassword(String password) {
this.password = password;
}
public String getPassword() {
return password;
}
public String doLogin() {
String un = username;
byte[] pw = password.getBytes();
FacesContext ctx = FacesContext.getCurrentInstance();
HttpServletRequest request = (HttpServletRequest) ctx.getExternalContext().getRequest();
CallbackHandler handler = new SimpleCallbackHandler(un, pw);
try {
Subject mySubject = Authentication.login(handler);
ServletAuthentication.runAs(mySubject, request);
ServletAuthentication.generateNewSessionID(request);
System.out.println(" Here :"+ctx.getViewRoot().getViewId());
String loginUrl = "/adfAuthentication?success_url=/faces" +ctx.getViewRoot().getViewId();
HttpServletResponse response = (HttpServletResponse) ctx.getExternalContext().getResponse();
sendForward(request, response, loginUrl);
} catch (FailedLoginException e) {
FacesMessage msg =
new FacesMessage(FacesMessage.SEVERITY_ERROR, "Incorrect user name or password",
"Incorrect user name or password was specified");
ctx.addMessage(null, msg);
} catch (LoginException e) {
e.printStackTrace();
}
return null;
}
public void sendForward(HttpServletRequest request, HttpServletResponse response, String forwardUrl) {
System.out.println("Forwarding ..."+forwardUrl);
FacesContext ctx = FacesContext.getCurrentInstance();
RequestDispatcher dis = request.getRequestDispatcher(forwardUrl);
try {
dis.forward(request, response);
} catch (IOException e) {
reportUnexpectedLoginError("IOException Exception",e);
e.printStackTrace();
} catch (ServletException e) {
reportUnexpectedLoginError("ServletException ",e);
e.printStackTrace();
}
ctx.responseComplete();
}
public void reportUnexpectedLoginError(String errorType, Exception e) {
FacesMessage msg = new FacesMessage(FacesMessage.SEVERITY_ERROR, "Unexpected Error during login","Error type ="+errorType);
FacesContext.getCurrentInstance().addMessage(null, msg);
}
}
In the UI project add the Weblogic Remote client Library
Add the managed bean to the request scope
Create loginPage.jspx withe username and password field
<?xml version='1.0' encoding='UTF-8'?>
<jsp:root xmlns:jsp="http://java.sun.com/JSP/Page" version="2.1" xmlns:f="http://java.sun.com/jsf/core"
xmlns:af="http://xmlns.oracle.com/adf/faces/rich">
<jsp:directive.page contentType="text/html;charset=UTF-8"/>
<f:view>
<af:document title="mypage.jspx" id="d1">
<af:form id="f1">
<af:link text="#{securityContext.authenticated?'Log out':'Login in'}" id="l1"
destination="#{securityContext.authenticated?'/adfAuthentication?logout=true&amp;end_url=/faces/welcome.jspx':'/adfAuthentication?success_url=/faces/welcome.jspx'}"/>
</af:form>
</af:document>
</f:view>
</jsp:root>
Create loginError.jspx for displaying errors. Make changes in the web.xml as below
Run the mypage.jspx and this will redirect to loginPage.jspx and you can see the web page as below
Login using the user defined in the jazn-data.xml and you can view the mypage.jspx with Logout link.
 Click on New and create a run configuration.
 Select the task flow for default run target.
 Click on the Task flow and select taskflow from the drop down
 Go to the run menu and run the 'Copy of Default' configuration created
 Save the run configuration and next time just run the required run configuration.